# Compile the World - Full Documentation
> Complete documentation for building Mini Apps on Worldchain, including all content from the documentation site.
This is the full expanded version of the Compile the World documentation, containing the complete text of all guides, tutorials, and reference materials.
---
## Claude
Source: https://compile.world/learn/ai-rules/claude
# Setting up Claude
---
## Cursor
Source: https://compile.world/learn/ai-rules/cursor
# Setting up Cursor
---
## Coding with AI
Source: https://compile.world/learn/ai-rules/
# AI Assisted Development
This section covers how to use AI tools to assist with coding tasks, including setting up various AI models and integrating them into your development workflow.
## Build faster with AI
AI tools can significantly speed up your development process by automating repetitive tasks, generating code snippets. Here are some tools and frameworks you can explore:
}
title="Claude"
href="/learn/ai-rules/claude"
/>
}
title="Cursor"
href="/learn/ai-rules/cursor"
/>
}
title="Windsurf"
href="/learn/ai-rules/windsurf"
/>
## Portable Context for AI Assistants
[`LLMS.txt`](https://llmstxt.org/) is a standard for providing LLM-friendly documentation access. This project automatically generates `llms.txt` and `llms-full.txt` files to help you add as context to your AI assistants.
- Short version - [llms.txt](https://www.compile.world/llms.txt)
- Full version - [llms-full.txt](https://www.compile.world/llms-full.txt)
---
This section is constantly evolving as new AI tools and models are released.
Stay tuned for updates and new guides on how to leverage AI in your coding
projects.
---
## Windsurf
Source: https://compile.world/learn/ai-rules/windsurf
# Setting up Windsurf
---
## Getting a message signature
Source: https://compile.world/learn/guides/commands/message-sign
# Setting up in app purchaces
---
## Handling Payments
Source: https://compile.world/learn/guides/commands/payments
# Setting up in app purchaces
---
## Sending a Transaction
Source: https://compile.world/learn/guides/commands/send-transaction
# Setting up in app purchaces
---
## Preview your app
Source: https://compile.world/learn/guides/developer-portal/app-preview
# Building your first mini app
---
## Adding Multiple Languages
Source: https://compile.world/learn/guides/developer-portal/lang-support
# Building your first mini app
---
## Getting Funds
Source: https://compile.world/learn/guides/getting-funds
# Setting up in app purchaces
---
## Integrating Permit2
Source: https://compile.world/learn/guides/how-to-permit2
# Setting up in app purchaces
---
## Setting up in app purchaces
Source: https://compile.world/learn/guides/smart-contracts/deployment
# Setting up in app purchaces
---
## Creating Smart Contracts on Worldchain
Source: https://compile.world/learn/guides/smart-contracts/development
# Creating Smart Contracts on Worldchain
Creating smart contracts for Worldchain is no different to creating them for any EVM-compatible blockchain, like Base, Optimism, or Ethereum. You can use the same tools and libraries you are already familiar with.
## Getting Started
To get started, and in this course we'll use [Hardhat](https://hardhat.org/) framework. It provides a robust environment for compiling, testing, and deploying smart contracts.
### Making a directory for your project
First, we need to create a directory from our terminal where we will create our Hardhat project. You can name it whatever you want, but for this example, we'll call it `mini-contracts`.
Use the following command to create the directory and navigate into it:
```bash
mkdir mini-contracts && cd mini-contracts
```
### Creating a Hardhat Project
Now that we have a folder setup, let's start with the project setup.
```bash npm2yarn
npx hardhat init
```
After running the command you'll see the following prompt:
```bash
888 888 888 888 888
888 888 888 888 888
888 888 888 888 888
8888888888 8888b. 888d888 .d88888 88888b. 8888b. 888888
888 888 "88b 888P" d88" 888 888 "88b "88b 888
888 888 .d888888 888 888 888 888 888 .d888888 888
888 888 888 888 888 Y88b 888 888 888 888 888 Y88b.
888 888 "Y888888 888 "Y88888 888 888 "Y888888 "Y888
👷 Welcome to Hardhat v2.26.0 👷
What do you want to do? …
Create a JavaScript project
Create a TypeScript project
❯ Create a TypeScript project (with Viem)
Create an empty hardhat.config.js
Quit
```
For this course, we'll choose the **Create a TypeScript project (with Viem)** option.
This will initialize the creation flow, you'll be prompted if you want to modify settings but simply press `Enter` to accept the defaults. Once the process is done, you will have a new Hardhat project ready to go.
## Adding Worldchain Network
By default, Hardhat is configured to work with a local network. We need to include Worlchain as a network in our Hardhat configuration.
First thing to do, is to open our freshly created project (`mini-contracts`) in a code editor. Second, locate the `hardhat.config.ts` file in the root of the project.
The `hardhat.config.ts` file is a place where you can configure your Hardhat project, including networks, compilers, and plugins.
To finalize the setup and include Worldchain you can copy-pasta the following code:
```ts filename="hardhat.config.ts"
import "@nomicfoundation/hardhat-toolbox-viem"
const WORLD_ETHERSCAN_API_KEY = process.env.WORLD_ETHERSCAN_API_KEY!
const DEPLOYER_PK = process.env.DEPLOYER_PK!
const config: HardhatUserConfig = {
solidity: "0.8.28",
etherscan: {
enabled: true,
apiKey: WORLD_ETHERSCAN_API_KEY,
customChains: [
{
chainId: 480,
network: "worldMainnet",
urls: {
apiURL: "https://api.worldscan.org/api",
browserURL: "https://worldscan.org/",
},
},
],
},
networks: {
worldMainnet: {
url: "https://worldchain-mainnet.g.alchemy.com/public",
accounts: [DEPLOYER_PK],
},
},
}
export default config
```
---
We're introduced a few new components here:
- **`WORLD_ETHERSCAN_API_KEY`:** When deploying a smart contract, sometimes you want it to be `verified` meaning anyone can see the source code and interact with the contract through Etherscan.
- **`DEPLOYER_PK`:** For deploying in Worldchain, you need gas to pay for the transaction and to actually execute the deployment. This is done by using a private key of an account that has ETH in Worldchain to sponsor the deployment.
---
## Reading a value from a smart contract
Source: https://compile.world/learn/guides/smart-contracts/read-value
# Reading a value from a smart contract
World Apps run in Worlchain, an **EVM compatible blockchain**, which means you can interact with smart contracts using the same methods as you would on Ethereum or other EVM chains.
For reading a value from a smart contract, you can use a library like [wagmi](https://wagmi.sh/) for react or [viem](https://viem.sh/) for vanilla JavaScript. These libraries provide a simple way to interact with smart contracts and read values from them.
## Example using wagmi
```javascript filename="App.tsx"
"use client"
export function App() {
const WLD_TOKEN_ADDRESS = "0x05a700132Fb88D4F565453153E6b05F2049fCb45"
const { data: totalSupply } = useReadContract({
abi: erc20Abi,
address: WLD_TOKEN_ADDRESS,
functionName: "totalSupply",
})
}
```
Checkout [Wagmi's documentation](https://wagmi.sh/react/getting-started) to learn more about everything you can do.
---
## Setting up in app purchaces
Source: https://compile.world/learn/guides/smart-contracts/verifying
# Setting up in app purchaces
---
## Calling a smart contract function
Source: https://compile.world/learn/guides/smart-contracts/write-value
# Calling a smart contract function
When you want to call a function that is not a view function (meaning it changes the state of the blockchain), you need to send a transaction to the smart contract. This is done by using the `sendTransaction` method of [MiniKit](https://docs.world.org/mini-apps/commands/send-transaction).
## Installing MiniKit
We need to install the `@worldcoin/minikit-js` package to use MiniKit in our Mini App project so we can interact with smart contracts.
```bash npm2yarn
npm install @worldcoin/minikit-js
```
Also make your life easier by installing [viem](https://viem.sh/). It comes with a lot of useful functions to interact with smart contracts.
```bash npm2yarn
npm install viem
```
This libraries come installed by default when using the `create-world-app`
command used in the [Writing your first Mini
App](/learn/guides/your-first-mini-app) tutorial.
## Here is a quick example to get you started
```ts filename="App.tsx"
"use client"
const sendTransaction = async () => {
// The following method will try to transfer
// 1 WLD token from the World App to another address
// using the `transfer` function of the ERC20 contract.
const WLD_TOKEN_ADDRESS = "0x2cFca85d8E48F8EAB294be644d9E25C3030863003"
const RECIPIENT_ADDRESS = "0x05a700132Fb88D4F565453153E6b05F2049fCb45"
const { commandPayload, finalPayload } =
await MiniKit.commandsAsync.sendTransaction({
transaction: [
{
address: WLD_TOKEN_ADDRESS,
abi: erc20Abi,
functionName: "transfer",
args: [
RECIPIENT_ADDRESS, // Address you want to send tokens to
parseEther("1"), // 1 WLD token
],
},
],
})
}
```
---
### Here we are introduced to a some new concepts:
- **ABI**: Application Binary Interface. This is essentially a `guide` or an interface that tells developers how to interact with smart contracts. An **API** if you will, but for smart contracts.
- **ERC20**: An standard interface for tokens on the [Ethereum blockchain](https://ethereum.org/en/developers/docs/standards/tokens/erc-20/). It defines how tokens can be transferred, how to get the balance of an account, and other basic functionalities.
- **parseEther**: A utility function in viem that converts a number to its representation with 18 decimal places. This is necessary because smart contracts often use integers not decimals, that's why we use a mantissa to represent the decimal places. For example, **1 WLD** token is represented as `1000000000000000000` in the smart contract.
---
## Vibe Coding
Source: https://compile.world/learn/guides/vibe-coding
# Building your first mini app
---
## Welcome
Source: https://compile.world/learn/
# Compile the World
This is a place where you can learn how to buil Mini Apps for Worldchain.
## Where to go next? 🫡
If you're new to Worldchain, and specially Mini Apps the [Worldchain 101 🌎](/learn/mini-apps-101/worldchain) section will give you a solid foundation about mini apps, the ecosystem, and how to get you started on building your very own Mini Apps.
And if you are looking for a more hands-on approach, take a look to the [Your First Mini App 🎁](/learn/your-first-mini-app) course to help you build your app bit by bit.
---
}
title="Worldchain 101"
href="/learn/mini-apps-101/worldchain"
/>
}
title="Building a Mini App"
href="/learn/your-first-mini-app"
/>
---
## MiniKit
Source: https://compile.world/learn/mini-apps-101/minikit
# Building with MiniKit
MiniKit is a javascript library that allows you to develop Web Apps (called Mini Apps) that can run inside World App and interact with the Worldchain network.
---
## Contracts
Source: https://compile.world/learn/mini-apps-101/smart-contracts
# Integrating Smart Contracts
Just as any EVM chain, you can deploy smart contracts to Worldchain. This allows you to create complex Mini Apps that can interact with the blockchain and other smart contracts.
From regular DeFi integrations, to gaming, to identity verification, smart contracts can be used to build a wide range of applications.
---
## World App
Source: https://compile.world/learn/mini-apps-101/world-app
# Introducing World App
World App exists to give everyone a simple way to prove they're human and access digital money. This aims to build a global financial network where real people to a fair access.
Whether you’re sending money, getting verified with World ID, or receiving free tokens, World App is your gateway to the Worldchain ecosystem.
---
## Worldchain
Source: https://compile.world/learn/mini-apps-101/worldchain
# What's Worldchain?
Worldchain is a blockchain designed to help real people use digital services easily and securely by proving they are human and not a bot. The process is done by analyzing your biometric data (like your iris) which helps to confirm you are a real human being.
## Key Features
- **Human verification:** People can use services labeled `for humans only` by proving they are a real person.
- **Fair access:** Verified humans get faster and cheaper access to apps.
- **Useful for communities:** It's made for real-world apps like payments or ID checks.
- **Fast and secure:** Runs on technology from Ethereum, but cheaper and more scalable.
---
## 📣 Official Channels
Source: https://compile.world/learn/need-help/channels
# Getting help from official channels
Sometimes you might need help with your Mini App, or you just want to chat with other developers. Here are some official channels where you can connect and get support:
1. [Developer Telegram Group](https://t.me/worldcoindevelopers) ― The best place to ask questions, share ideas, and get help from other developers.
2. [Worldchain Announcements](https://t.me/WorldBuilderAnnouncements) ― Official announcements and updates about Worldchain.
3. [Worldchain Discord](https://world.org/discord) ― Not so focused on
4. [Twitter/X](https://x.com/worldcoin) ― Follow World for the latest news, updates, and announcements about Worldchain and Mini Apps.
---
## 🎙️ Community Office Hours
Source: https://compile.world/learn/need-help/community-office-hours
# Join our Community Office Hours
We host weekly community office hours where you can ask questions, get help with your Mini Apps, and connect with other developers.
See this as an special session to showcase work, get direct support from the core team, and validate your ideas.
## When do we meet?
We meet every **Thursday at 4:00 PM UTC** on [Worldchain Discord](https://world.org/discord) in the [`#office-hours`]() channel.
## Anything I need to prepare?
Nope! Just bring your questions, if you have any, else it's fine to join us and listen to the conversation. Other developers might share their work, ideas, and challenges, and you can learn from them too.
---
Community office hours are paused until further notice. We will announce the
next session on [Discord](https://world.org/discord)
---
## 👔 Professional Assistance
Source: https://compile.world/learn/need-help/profesional-assistance
# Feeling stuck and need professional help?
Compile World is a community-driven hub, but sometimes you might need more personalized assistance to get your Mini App off the ground.
We offer proffesional assistance to help you build your Mini App, from ideation to deployment. Our team of experienced developers can guide you through the process, provide feedback on your app, and help you overcome any challenges you might face.
[Book a call](https://cal.com/compileworld/30min) • [Chat with us](https://t.me/worldcoindevelopers) • [Quote calculator](https://world.org/quote)
---
This is a paid service, and we will work with you to understand your needs and
provide a quote based on the scope of work.
---
## Address Book
Source: https://compile.world/learn/resources/addresses
export function ContractRow({ label, children, address, isERC20 }) {
const explorerURL = `https://worldscan.org/${
isERC20 ? "token" : "address"
}/${address}`
const linkElement = children?.props?.children
return (
{label}
{address}
{React.isValidElement(linkElement)
? React.cloneElement(linkElement, {
href: explorerURL,
})
: linkElement}
) }
# Good to know addresses
This is a collection of smart contract addresses that you might find useful when building Mini Apps. These addresses are official (Genesis Deployment) and should be used in production.
## ERC20 Tokens
[Explorer](https://)
[Explorer](https://)
[Explorer](https://)
You can directly call `transfer` method from any ERC20 token listing them as
**Contract Entrypoints** in the Developer Portal
## Smart Contracts
[Explorer](https://)
[Explorer](https://)
[Explorer](https://)
### Short Description
**Permit2:** World Mini Apps do not allow approvals (`approve` method) so you will need to use the `permit` method to allow your Mini App to transfer tokens on behalf of the user. This is done automtically by using MiniKit in the [`sendTransaction`](/learn/guides/commands/send-transaction) method.
**Address Book:** A contract that stores verified (With Orb) World ID addresses. Useful for allowing _"human-only"_ actions in your Mini App.
---
See the full list of Uniswap V3 contracts on the [Uniswap Docs](https://docs.uniswap.org/contracts/v3/reference/deployments/WorldChain-deployments).
---
## Continue Learning
Source: https://compile.world/learn/resources/continue-learning
# Let's keep your Mini App Development Journey going ✨
Worldchain and World App are powerful tools for building decentralized applications. The ecosystem is really new and maybe small compared to other de-facto chains, yet Worldchain and Mini Apps are growing rapidly. Here are some resources to help you continue your learning journey:
- [Official Dev Docs](https://docs.world.org/)
- [ETHGlobal Taepei 2025 Talk about Mini Apps](https://www.youtube.com/watch?v=07DFjyIXTY0&t=7s)
---
## What to build?
Source: https://compile.world/learn/resources/looking-for-ideas
# Building your first mini app
---
## Common Issues
Source: https://compile.world/learn/troubleshooting/common-issues
# Common issues and how to solve them
This is a collection of common issues that developers face when building Mini Apps + their solutions. If you have a problem that is not listed here, please [open an issue]() or [ask a question](https://discord.gg/worldchain) in our Telegram chat.
## Reverse Proxy Issues
When working with Mini Apps, you might want to run your app locally and use a service like [ngrok](https://ngrok.com/) to expose your local server to the internet. This is useful for testing your app in World App. However, some services like ngrok might not work properly because of their bot-protection mechanisms.
**Solution:** Use a different reverse proxy service. After many tests, we've found the following services to work well with World App:
Service
Experience
Comments
[Cloudflare
Tunnel](https://developers.cloudflare.com/pages/how-to/preview-with-cloudflare-tunnel/)
Best
Requires a Cloudflare account
[Tunnelmole](https://tunnelmole.com/)
Good
Super easy setup
[Telebit](https://telebit.cloud/)
Good
Requires email sign-in
[Serveo](https://lottunnels.github.io/lottunnels/Binaries/serveo/)
Good
A free alternative to ngrok
## Mini App Not Loading
If you've tried to open your app and it won't load to the points you start pulling your hair out, here is a cross-check list of things to do (ordered by likelihood of being the issue):
- **Developer Portal Cache:** Not confirmed by the World team, but it seems that the portal caches the QR code you get for testing the Mini App. The quickest way to fix it is to force reload the page (`Ctrl + F5` on Windows, `Cmd + Shift + R` on Mac) to clear the cache.
- **Force Stop World App:** World App might cache your app too. Close the World app and start it again. (Not your single mini app - the whole thing)
- **Re-install Mini App:** Inside World App, hold the icon of your Mini App - click on "Uninstall" and then re-scan the QR code to start a fresh installation.
Your app should be back and ready to rock again to this point. If it still doesn't work, try getting some help in the [Developer Channels](/learn/need-help/channels)
## The White Screen
When your app goes trough the loading process, it might get stuck on a white screen. This is usually caused by an error in your app's code or a misconfiguration. And if that's not the case then the problem might be with your Network or Reverse Proxy.
**Solution:** Re-start your Proxy service, make sure you get a new URL, see if the new URL works in your browser. If it does, re-scan the QR code in World App to update the Mini App URL.
Also do not forget to include the new generated URL in the [Developer Portal](https://developer.worldcoin.org), otherwise the app will never load.
---
## Environments
Source: https://compile.world/learn/troubleshooting/dev-prod
# Mini App Environment 101
Whe creating Mini Apps, it's important to understand that we do not have an "staging" environment. Instead, what as a developer you can do is to create 2 different Mini Apps, one for development and one for production. This way you can test your app in World App before releasing it to the public.
While doing this you also want to keep your production configuration (addresses, API keys, etc.) in the development version of your Mini App. This way you can test your app in World App with the same configuration that will be used in production.
There's a work in progress to introduce "drafts" but the World team itself
suggests to stick to the 2 Mini Apps approach.
---
## Console Logs
Source: https://compile.world/learn/troubleshooting/logs
# Wait, where's the web console?
Mini Apps are rendered inside the World App in a WebView but we can't inspect or debug like we do in the browser. Yet you can install a JS library to show a developer console to help you debug your Mini App.
Below are some options to help you debug your Mini App:
## Eruda: The Console For Mobile Browsers
[Eruda](https://github.com/liriliri/eruda) is a simple and easy to install library that provides a console for mobile browsers.
---
## Transaction Debugging
Source: https://compile.world/learn/troubleshooting/tx-debug
# Smart Contract Transaction Debugging
When working with Mini Apps, you may encounter (as in any web3 dapp) issues related to smart contract transactions. Debugging these transactions can be challenging, especially when they fail or behave unexpectedly.
Transactions inside World App can be executed by calling the [`sendTransaction`](/learn/guides/commands/send-transaction) method of [MiniKit](https://docs.world.org/mini-apps/commands/send-transaction).
## Using Tenderly for Debugging
The best way to debug and try to understand a broken flow is by using [Tenderly](https://tenderly.co/) to simulate the transaction. Each transaction inside World App returns an id that can be used to simulate the transaction in Tenderly.
## When using permitted transfers
When using [Permitted Token Transfers](/learn/guides/how-to-permit2) the transaction id (used to simulate your transaction in Tenderly) won't be returned at instant because Permit2 transfers have a time window or deadline to be executed.
**The solution:** When using Permit Transfers set the timeout close to `0` to get the transaction id immediately.
---
## 💊 Nice, you've taken the red pill!
Source: https://compile.world/learn/your-first-mini-app/dev-setup
# 💊 Nice, you've taken the red pill!
Before we start, there are a few things you need to get ready for building your Mini Apps:
- **NodeJS** installed on your computer. If you don't have it, you can download it from [nodejs.org](https://nodejs.org/).
- A **code editor**. We recommend using [Visual Studio Code](https://code.visualstudio.com/).
- A **terminal**. The one that comes with your OS is fine, if you prefer get a new one, [Hyper Term](https://hyper.is/) is a great option.
- To have **World App** installed on your phone. Available in the [App Store](https://apps.apple.com/no/app/world-app-worldcoin-wallet/id1560859847) and [Google Play](https://play.google.com/store/apps/details?id=com.worldcoin).
- **Tea** or **coffee** to keep you energized during the process ☕️
- Willingness to learn, experiment, and **have fun!** 🎉
---
# 🛠️ Setting up the development environment
Let's start by creating a new project from a template. This will give us a good starting point with all the necessary files and configurations.
Open your terminal and run the following command:
```bash npm2yarn
npx create-world-app my-app
```
The command gives you a prompt to select a template. You can choose the recommended one (Next 14).
```ansi
�[0;32m➜�[0m npx create-world-app my-app
�[0;32m┌�[0m Let's create your mini app
�[0;32m│�[0m
�[0;32m◆�[0m Select a template
�[0;32m│�[0m �[1;32m●�[0m Next 14 (recommended)
�[0;32m│�[0m �[2m○�[0m Next 15
�[0;32m└�[0m
```
The process will take a few minutes to complete. Once it's done, you will have a new folder called `my-app`. We need to open this folder in our code editor to start working on our Mini App.
There are many ways to do it, here are a few options:
- **VsCode Command**: In the current terminal, run the command `code my-app`
- **App Command**: In the terminal, run the command `open -a "Visual Studio Code" my-app`
- **Drag and Drop Method**: Open your code editor and drag the `my-app` folder into it
And that's it! You are now ready to build the dopest Mini App ever! 🎉
---
## Building your first mini app
Source: https://compile.world/learn/your-first-mini-app/
# Building your first mini app
You are about to embark on an exciting journey to create your first Mini App for Worldchain. This course will guide you through the essential steps to build a functional Mini App that can interact with the Worldchain network.
If this is the very first time you are building a Mini App or doing anything related to Worldchain, don't panic 🙂.
We'll start with the basics and gradually build up your knowledge and skills. This is a community generated course, so we've been in your shoes before and we know how it feels to be overwhelmed by all the new concepts and technologies. Yet we also know how rewarding it is to see your first Mini App come to life.
---
## Opening your Mini App
Source: https://compile.world/learn/your-first-mini-app/loading-app
# Opening your Mini App
Mini Apps are built using Web Technologies like HTML, CSS, and JavaScript. This means you can view your Mini App in a web browser just like any other website.
Using web technologies helps us to quickly see how our app looks like without needing to constantly check it inside the World App.
## And... how do I do that?
To view your Mini App in a browser, follow these steps:
## Locate the `mini-app` folder
Search for the `my-app` folder you created earlier. This is where our Mini App files are stored. If you followed the previous steps, it should be where you ran the `create-world-app` command.
## Start the development server
Open a terminal in the `my-app` folder. You can do this by right-clicking the folder and selecting "Open in Terminal" or using your code editor's terminal feature.
And run the following command to start the development server:
```bash npm2yarn
npm run dev
```
## Open your browser
Navigate to [http://localhost:3000](http://localhost:3000) in your web browser. This is where your Mini App should be running
# Tada 🎉
You should now see something like this:
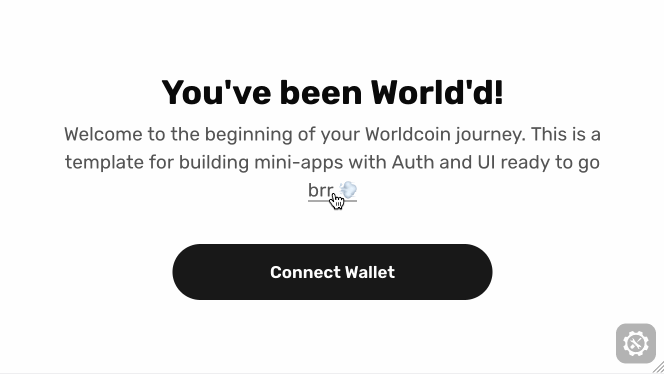
Hey. This is a great milestone! You have to feel proud if it's your first time
in the Mini App world. And even if it's not, you are still doing great! Keep
it going! 🚀
---
## Setting up in app purchaces
Source: https://compile.world/learn/your-first-mini-app/payments
# Setting up in app purchaces
---
## Allowing anyone to use your creation
Source: https://compile.world/learn/your-first-mini-app/publish
# Allowing anyone to use your creation
---
## Fetching user information
Source: https://compile.world/learn/your-first-mini-app/user-data
# Fetching user information
---
## Amazing... but how do I code the thing?
Source: https://compile.world/learn/your-first-mini-app/whats-this
# Amazing... but how do I code the thing?
When you open the mini app folder you will see a bunch of files and folders, which might look a bit overwhelming at first. You'll get used to it, don't worry. The most important files for you to know about are:
- `app/page.tsx`: This is the main file of your Mini App. It's where you will write your code and build your app.
- `app/Brr.tsx`: In React, everything is a component. And this is a sample component you can use to get to know how components work.
- `app/global.css`: Used to give some style 💅 to our Mini App. We won't be using this file too much because instead our app comes equiped with TailwindCSS.
---